An intro to Stimulus JS: well-factored JavaScript for server-rendered applications
Stimulus is a JavaScript framework from Basecamp that provides consistent conventions and hooks for JavaScript that manipulates the DOM in server-rendered applications. It aims to fill some gaps that have always existed for developers who embrace a traditional server-rendered paradigm (and who may also be using libraries like Turbolinks or PJAX) but who also need to integrate one-off functionality in JavaScript. Stimulus does not at all concern itself with client-side (nor isomorphic) rendering and emphatically does not aim to be a heavy-client app framework like React, Angular or Vue.js. Instead it was created to support apps that are server-rendered first, and that rely on custom JavaScript where appropriate for UI enhancement.
In the existing paradigm, at least as concerns Ruby on Rails applications, it has been up to the developer to decide how to structure whatever custom JavaScript they have beyond UJS and SRJ responses. Stimulus gives us strong conventions to replace the ad-hoc or custom/bespoke approaches we may have previously taken to such work.
Getting started
Stimulus is distributed as an npm package and assumes that you will be using a JavaScript toolchain to load it into your application. If you are using Ruby on Rails, the conventional path here is to use Webpacker. If you’re starting a Rails 5.1+ application from scratch, you can have this done for you automatically by supplying the --webpack flag to rails new:
|
1 |
rails new your_app_name --webpack |
If you have an existing Rails application that does not yet utilize the webpacker buildchain, you will need to manually add gem 'webpacker' to your Gemfile. Next, whether you created the app with the --webpack flag or not, you will have to run:
|
1 |
bundle exec rails webpacker:install |
This will bootstrap the project’s package.json file with an appropriate "@rails/webpacker" client-side dependency and "webpack-dev-server" development dependency to complement the Ruby library.
Once you’ve installed and configured Webpacker in this way, you can add Stimulus as a dependency as well in package.json and then run yarn install:
|
1 2 3 4 5 6 7 8 9 10 11 |
{ "name": "stimulus-demo", "private": true, "dependencies": { "@rails/webpacker": "^3.2.2", "stimulus": "^1.0.1" }, "devDependencies": { "webpack-dev-server": "^2.11.1" } } |
Getting into the code
In the interest of making an example that is realistic and not contrived, I’ve decided to implement a slider-based rating widget, something that would not have fit neatly into a UJS/SJR paradigm. We’ll be building a shell of this component entirely in the DOM, and then adding the critical interactivity using a Stimulus controller.
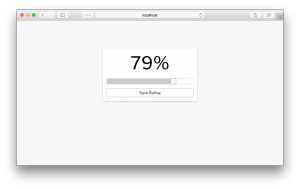
The rating widget will consist of a custom slider component, along with a large text display of the percent-rating the user has chosen. It will look like this when done:

Note that the slider component is actually a combination of a range input (with styled handle and hidden track) placed atop a progress-bar type element. This is done to have more control over the fidelity of the UI than the CSS track pseudoclasses (::-webkit-slider-runnable-track and its other vendor-prefix brethren) permit. In this way it is a very realistic example of how one might use Stimulus when a high degree of UI fidelity and interactivity is required.
We’ll assume a very simple Rating domain model consisting of just an integer value and timestamps:
|
1 2 3 4 5 6 7 8 9 |
# schema migration class CreateRatings < ActiveRecord::Migration[5.1] def change create_table :ratings do |t| t.integer :value, default: 50 t.timestamps end end end |
|
1 2 3 |
class Rating < ApplicationRecord validates :value, presence: true, inclusion: 1..100 end |
We can now create a simple erb partial for the Stimulus-backed rating widget:
|
1 2 3 4 5 6 7 8 9 10 11 12 13 14 15 16 17 18 19 20 |
<div class='rating-widget' data-controller='rating-widget'> <%= form_for @rating do |f| %> <div class='number-display' data-target='rating-widget.numberDisplay'> <%= f.object.value %>% </div> <div class='rating-bar'> <%= f.range_field :value, in: 1..100, class: 'rating-slider', data: { target: 'rating-widget.slider', action: 'input->rating-widget#valueChanged' } %> <div class='rating-bar-inner' data-target='rating-widget.innerBar' style="width: <%= f.object.value %>%;"></div> </div> <%= f.submit "Save Rating", class: 'submit-rating' %> <% end %> </div> |
You will note the data-controller, data-target and data-action attributes present in this markup. These are Stimulus directives. Stimulus looks for data-controller directives within the page’s markup and uses these to bind the appropriate Stimulus controller class. By the convention of the library, if you have supplied the controller name “something-controller” in the attribute, Stimulus will look for the controller implementation in a file named either something_controller.js or something-controller.js.
Loading the library
When we ran the webpack:install task, Webpacker created a app/javascript/packs directory and dropped an application.js file into it. We can use this to load Stimulus:
|
1 2 3 4 5 6 7 8 |
# in your app/javascript/packs/application.js import { Application } from "stimulus" import { definitionsFromContext } from "stimulus/webpack-helpers" const application = Application.start() const context = require.context("./controllers", true, /\.js$/) application.load(definitionsFromContext(context)) |
We must also load the application pack into our page using the javascript_pack_tag helper:
|
1 2 3 |
<!-- ...in your application layout head or footer... --> <%= javascript_pack_tag 'application' %> <!-- ... --> |
Note: you will also need to run the Webpack dev server, which you can do via a webpacker-provided binstub: bin/webpack-dev-server.
Creating the controller
With Stimulus’ autoloading initialized in this way and loaded into your page with Webpacker, all you need to do to load or initialize your controllers is to follow Stimulus’ naming conventions. We can now create a controller class in app/javascript/packs/controllers to bind to our rating widget:
|
1 2 3 4 5 6 7 8 9 10 11 12 13 14 15 16 17 18 19 20 21 22 23 24 25 |
// in app/javascript/packs/controllers/rating_widget_controller.js import { Controller } from 'stimulus' export default class extends Controller { valueChanged() { this.numberDisplay.textContent = this.innerBar.style.width = `${this.rating}%`; } get rating() { return parseInt(this.slider.value); } get slider() { return this.targets.find('slider'); } get numberDisplay() { return this.targets.find('numberDisplay'); } get innerBar() { return this.targets.find('innerBar'); } } |
What is wonderful about Stimulus is that a quick look at the original template markup adds remarkable clarity to the bindings and behavior going on in this JavaScript class:
|
1 2 3 4 5 6 7 8 9 10 11 12 13 14 15 16 17 18 19 20 |
<div class='rating-widget' data-controller='rating-widget'> <%= form_for @rating do |f| %> <div class='number-display' data-target='rating-widget.numberDisplay'> <%= f.object.value %>% </div> <div class='rating-bar'> <%= f.range_field :value, in: 1..100, class: 'rating-slider', data: { target: 'rating-widget.slider', action: 'input->rating-widget#valueChanged' } %> <div class='rating-bar-inner' data-target='rating-widget.innerBar' style="width: <%= f.object.value %>%;"></div> </div> <%= f.submit "Save Rating", class: 'submit-rating' %> <% end %> </div> |
The controller binding itself occurs in the top-level element with the data-controller="rating-widget". The other elements that we are accessing via slider/numberDisplay/innerBar getters had been clearly marked as Stimulus targets with the data-target attribute in the markup. Finally, the bit of interactivity that we have (valueChanged function) was transparently bound using the attribute data-action="input->rating-widget#valueChanged". Note: the input-> portion of the attribute value is a directive to Stimulus to bind to the oninput DOM event (which is called any time the slider moves, vs onchange which would trigger only when the control has been let go of and the value has changed).
After adding a bit of styling, we will have the fully interactive component that we had shown earlier in this article:

Moving the slider causes the rating percent text to update and also moves the fat progress bar behind the slider. The bindings are crystal-clear and, save for the matter of getting the Webpack configuration set up in the first place, there is very little boilerplate.
Conclusion
This was a rather basic feature that we built, but it highlights the central concepts of the Stimulus library (controller, target and action bindings) as well as the steps necessary to fully integrate the library into a Ruby on Rails application. It is important to note that Stimulus is not an outright replacement for the asset pipeline. While it is wonderful to finally have a library that strengthens conventions around JavaScript components in our server-rendered web apps, you may still find it practical to lean on the asset pipeline, UJS and SJR for much of your app’s basic interactivity. That said, for the bits that don’t neatly fit those paradigms, it’s great to finally have something like Stimulus.


2 Comments
Daniel K lima
February 20, 2018Great example of a real use case. I want to mention that for stimulus 1.0.1 the autoload at application.js is something different now:
import { Application } from "stimulus"
import { definitionsFromContext } from "stimulus/webpack-helpers"

const application = Application.start()
const context = require.context("./controllers", true, /\.js$/)
application.load(definitionsFromContext(context))
Nicholas
February 20, 2018Thanks a lot! I've updated it accordingly just now.